How to build a shot list for brand photography
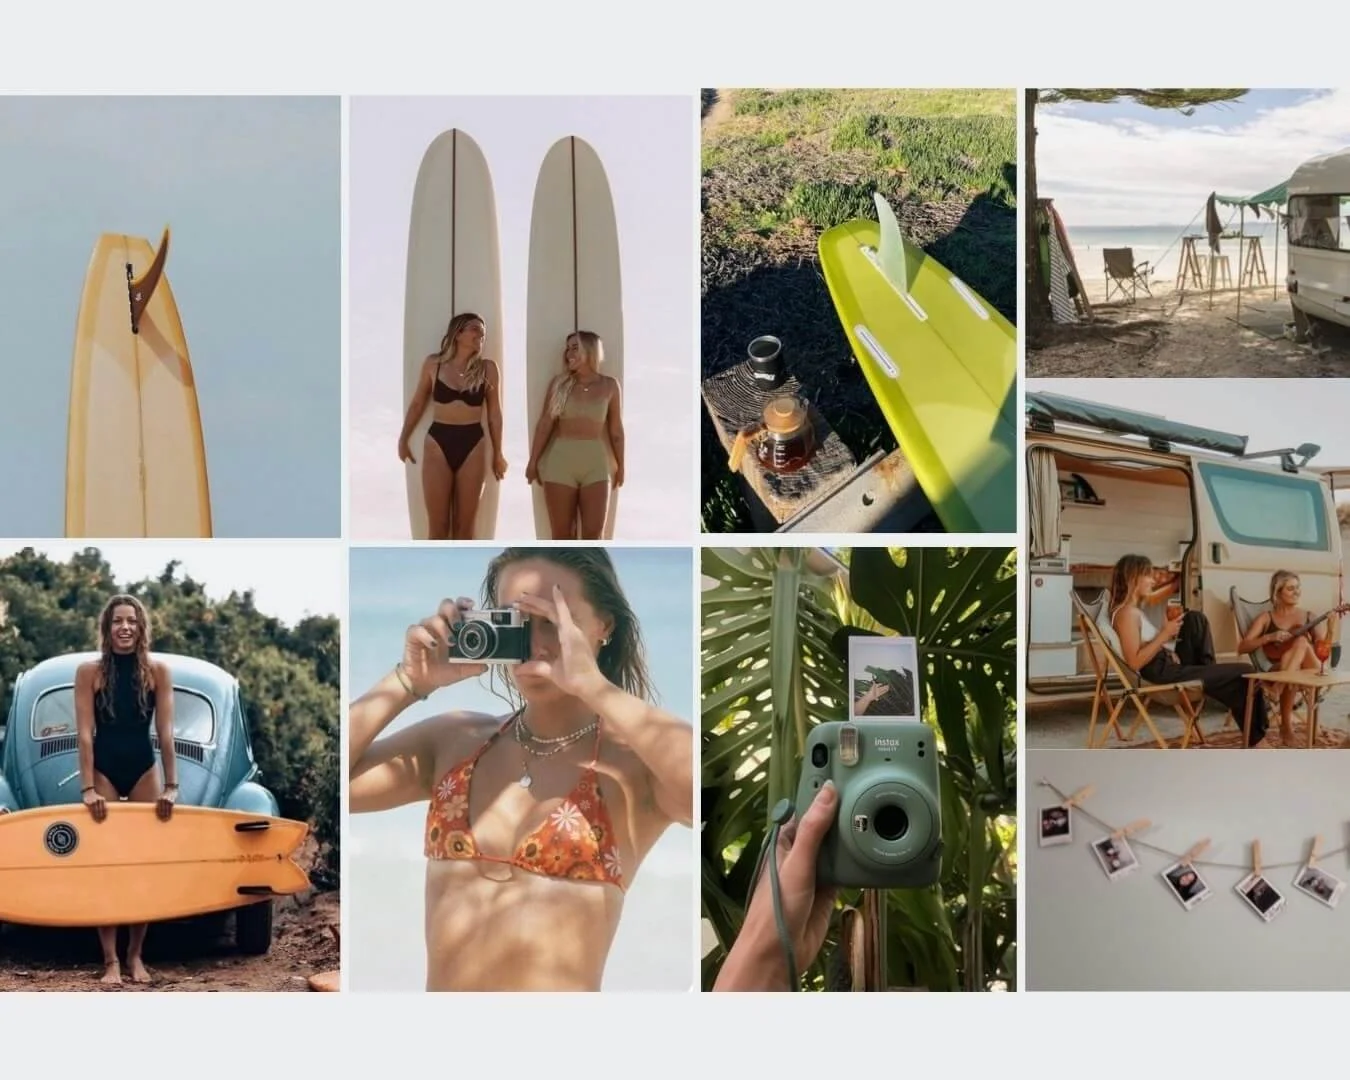
Behind the scenes on a surf lifestyle campaign. Every great shoot starts with a shot list.
Do you remember your first brand shoot? Mine felt like total chaos. Too many ideas, not enough structure, and the constant worry I was missing something important. The thing that changed everything for me was creating shot lists for brand photography.
A shot list isn’t just a checklist. It’s your creative safety net. It gives the shoot structure and flow while still leaving space for those magic, unplanned moments.
Below, I’m sharing exactly how I build shot lists for brand photography, from client goals to final delivery, so shoots feel calm, intentional, and creatively free.
How to build a shot list for brand photography:
Why shot lists matter
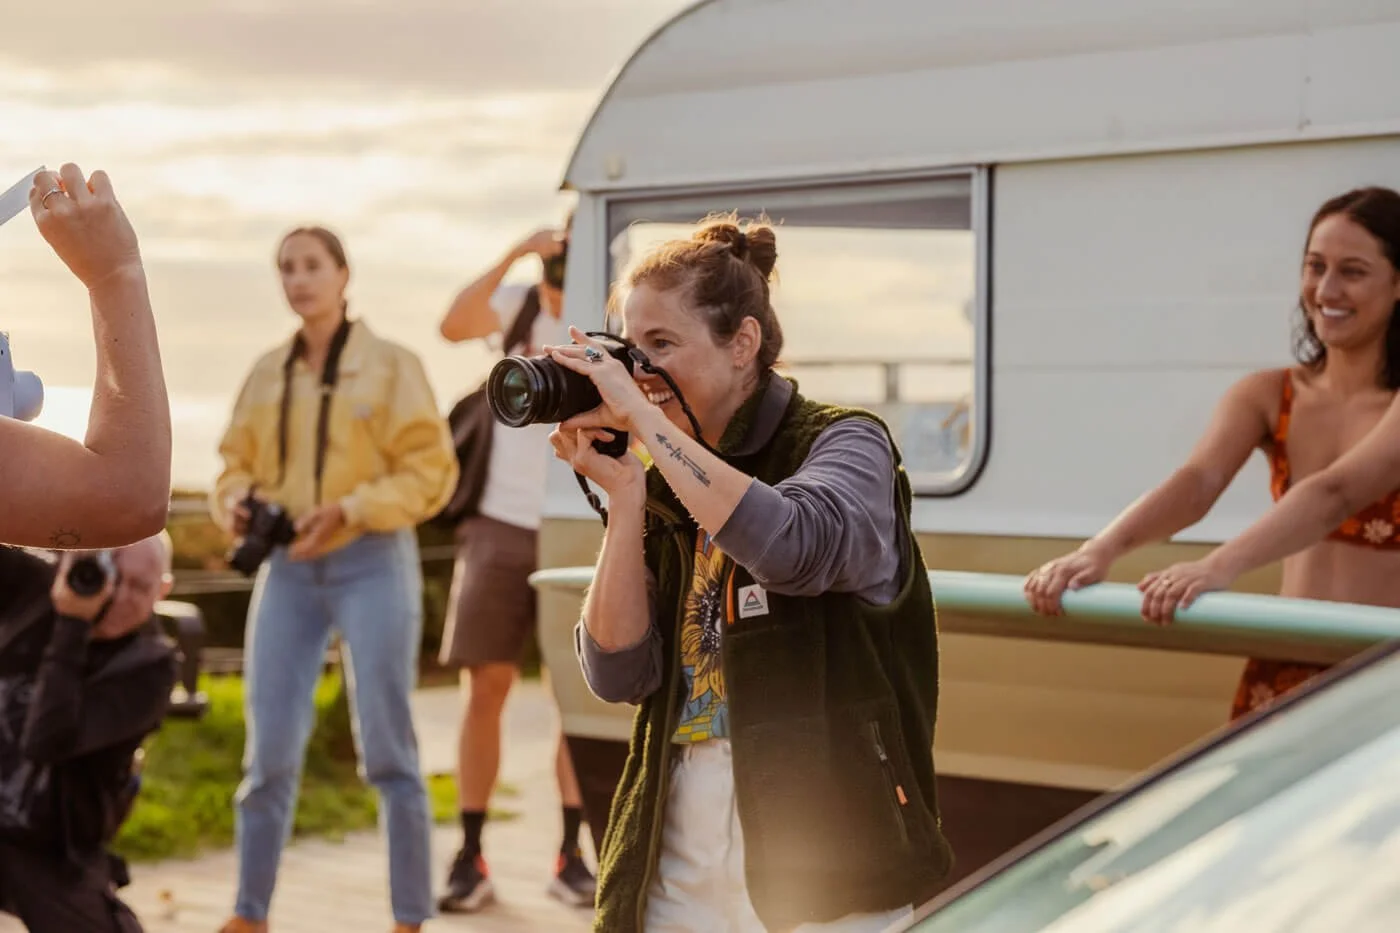
I’ve worked on both sides of the table as a brand and content manager commissioning shoots, and as a photographer delivering them. That perspective has shaped the way I work.
On the client side, I know the pressure to come back with usable content. Assets aren’t just nice to have, they’re tied to launches, campaigns, and seasonal pushes.
On the photographer side, I know how easy it is to get carried away with creative ideas. The balance is making sure you’re capturing what the client really needs while still giving yourself the freedom to create something beautiful, all within an intended time frame.
That’s why a brand photography shot list matters. It helps you deliver exactly what the client is paying for while giving you the confidence to play.
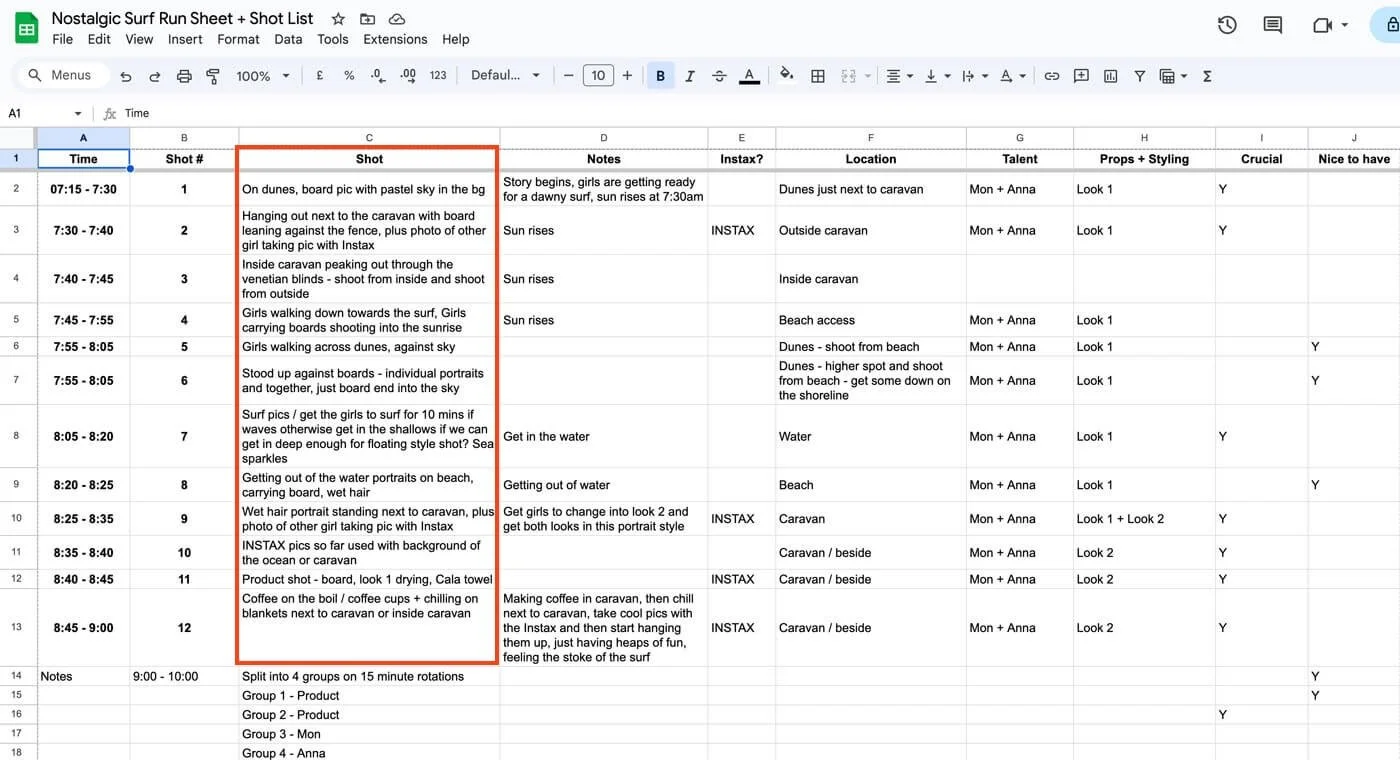
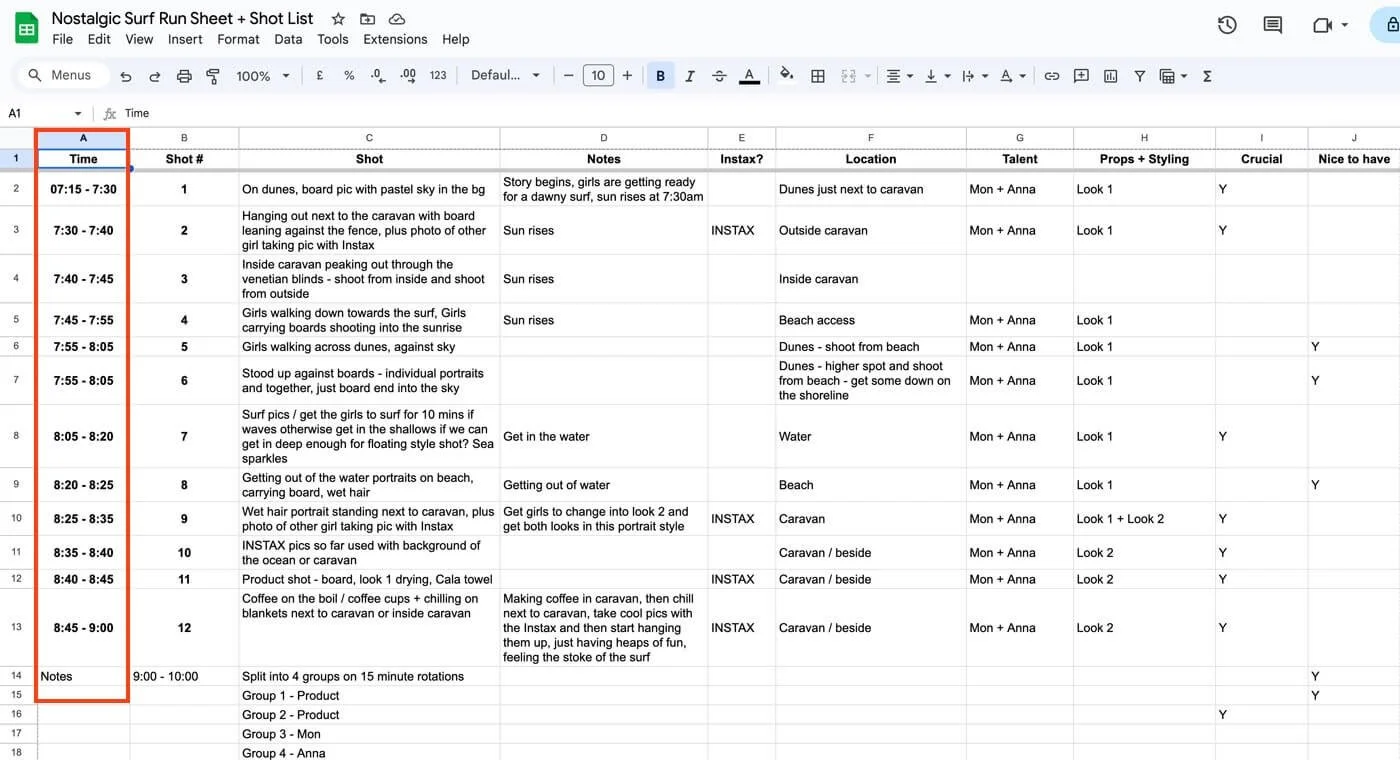
In this blog post, I’ll be using my Nostalgic Surf brand photography shoot as an anchor example so you can see what goes into building a shot list. Here is the master example which I’ll break down throughout the post (hot tip, read this post on your desktop, laptop or tablet for optimum viewing).
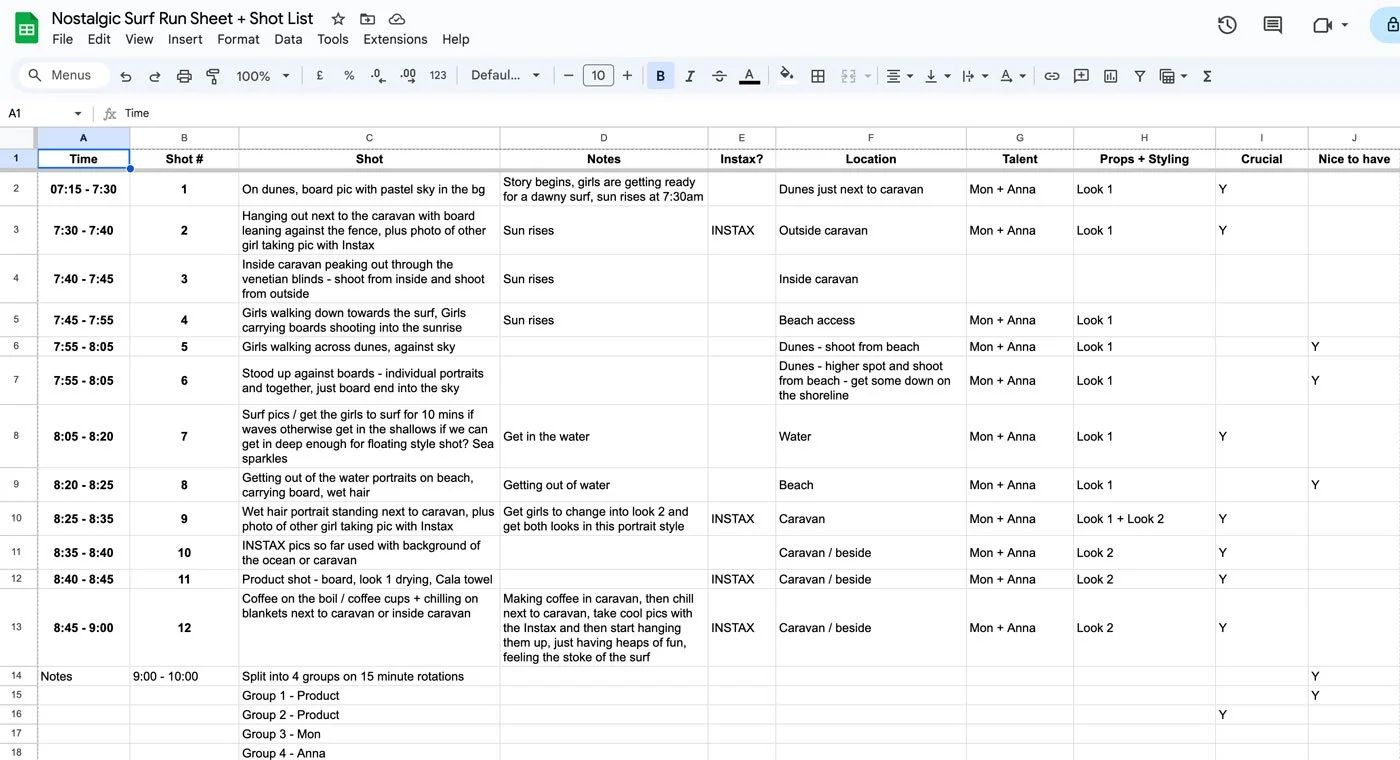
Shot list, run sheet, and a master planning doc; this began with the fundamentals, understanding exactly what we want to achieve in the photoshoot, which always starts with the client’s objective and expands from there.
Step 1: Start with the client’s goals
Before I touch my camera, I always ask the client: what’s the intended use for these images? Knowing whether the images will be used for website banners, social media posts, or for print or digital flyers informs how you shoot, as well as what you shoot.
Website banners usually need wide, clean shots with space for text
Social campaigns thrive on vertical lifestyle content and playful moments
Print often needs higher resolution and stronger compositions
If you don’t know where the images will live, you risk delivering something beautiful but unusable.
Step 2: Understand which products will be featured in the brand shoot
Next, almost as equally important and the overall objective of the brand photography shoot, I’ll look to understand which products my clients want to shoot and will create looks which will be plotted into the shot list.
Sometimes clients need a whole range shot. Other times just the hero pieces.
Understanding how many products need to be photographed helps you understand the scope of a project almost immediately. If it’s 16 products, that’s going to be lots of outfit changes (or lots of talent!) and possibly one to two days on location. If it’s just four products and two models then you can comfortably achieve this in a half day photo shoot, or less depending on the requirements.
Typically, I ask to see the products that require photographing, then move onto step 3 in this post, before returning to the shot list to plot in where each look will feature.
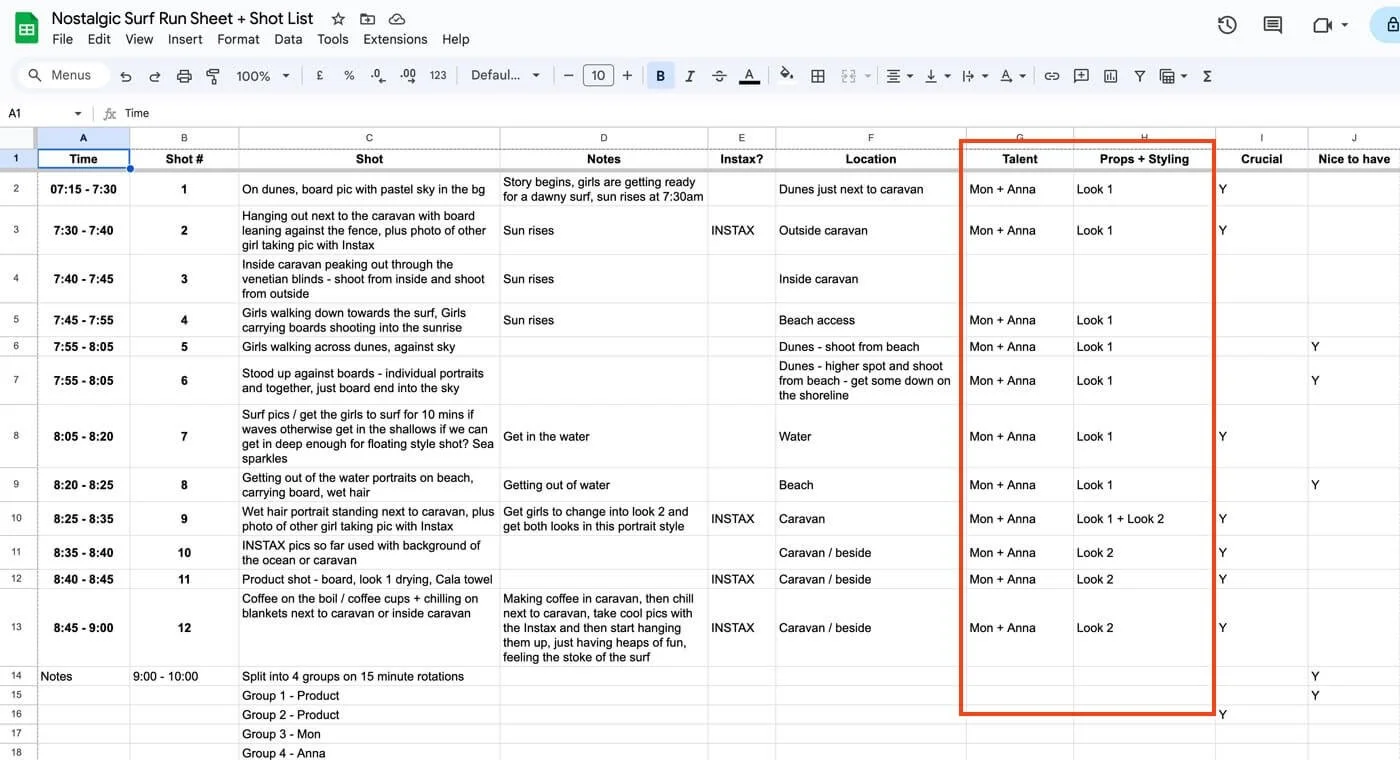
I’ll add a column for ‘talent’, and ‘props and styling’ so we know exactly who features in each part of the shoot and what they’ll be wearing. This also helps with planning sizes and products for the client to provide.
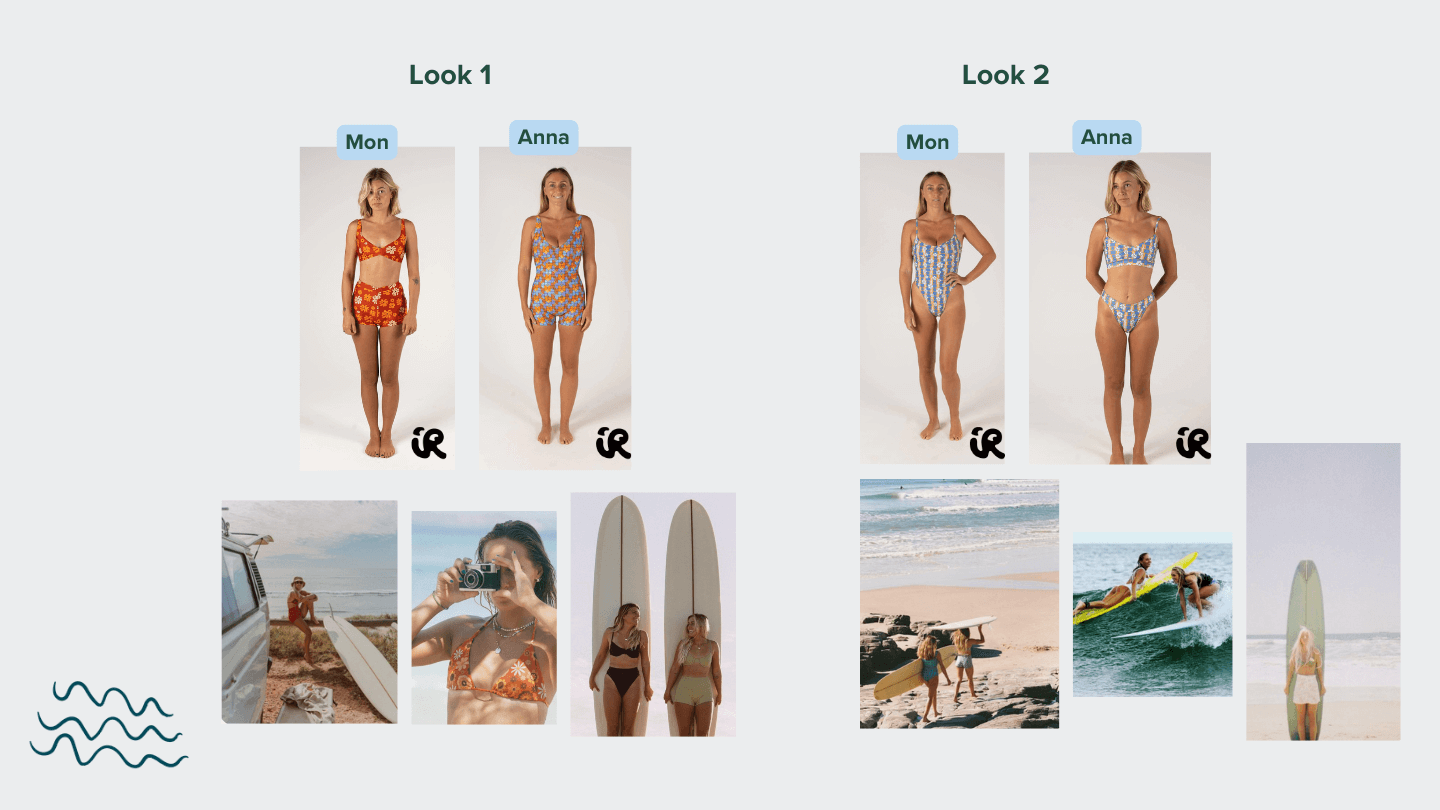
Here’s a page I compiled in my visual planning doc, I did this after outlining the shot list and deciding talent, but you get the idea of how important it is to manage expectations for the client about what the intended setting is for each product.
Step 3: Compile the core shot list
The core shot list comes from information and inspiration pictures the client has provided, as well as any imagery I’ve found through my own research.
I break my lists into categories. It makes them way easier to follow on location, making sure I have each of these accounted for when writing out the core shot list:
Lifestyle portraits: people with the product or brand
Product detail shots: close-ups that highlight design
Storytelling wides: environmental shots that set the mood
Candid moments: those in-between natural shots clients love for socials
When I shot a bed linen campaign recently, this method was crucial. The brand needed crisp detail shots for their website, styled lifestyle images for social media, and more editorial frames for press. Without structuring my list this way, I could’ve overshot one category and missed another.
For the Nostalgic Surf shot list, I follow a simple storytelling structure based on a sunrise surf and coffee on a caravan stay at the beach. It can be as simple as that, and the shot list unfolds from there. This one is very time dependent, but you may have a shoot that isn’t as dependent on the entire photoshoot running along one storyline - a common thread is always helpful though!
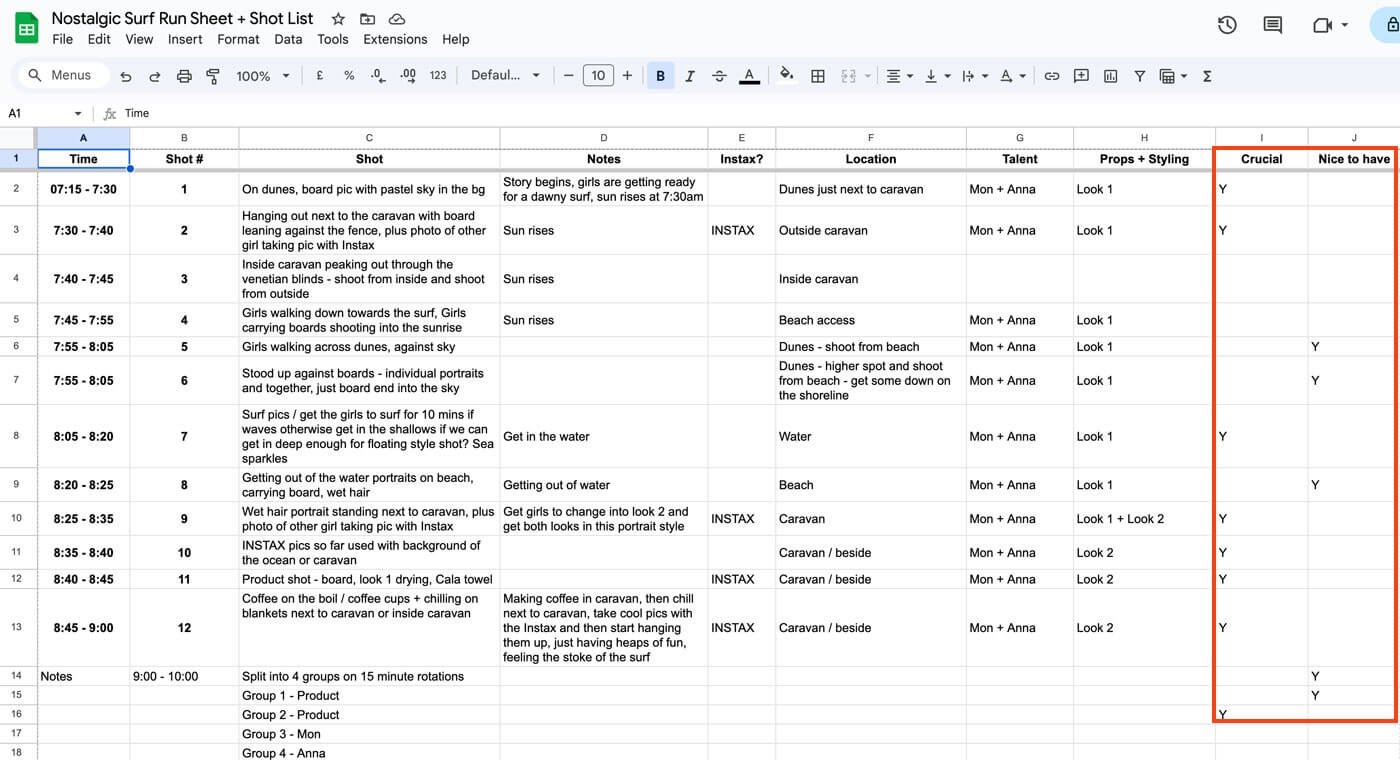
Step 4: Decide what shots are must-have vs nice-to-have
Not every shot is equal. I always split my list into two:
Must-haves: if nothing else, these get delivered
Nice-to-haves: creative extras if time and light allow
At Nostalgic Surf, my must-haves were lifestyle portraits, wide establishing shots of the beach, and surf action. My nice-to-haves were creative details like sun flares, surfboards dripping with seawater, and candid laughter between models.
That way I’m covering the essentials and still leaving space for play.
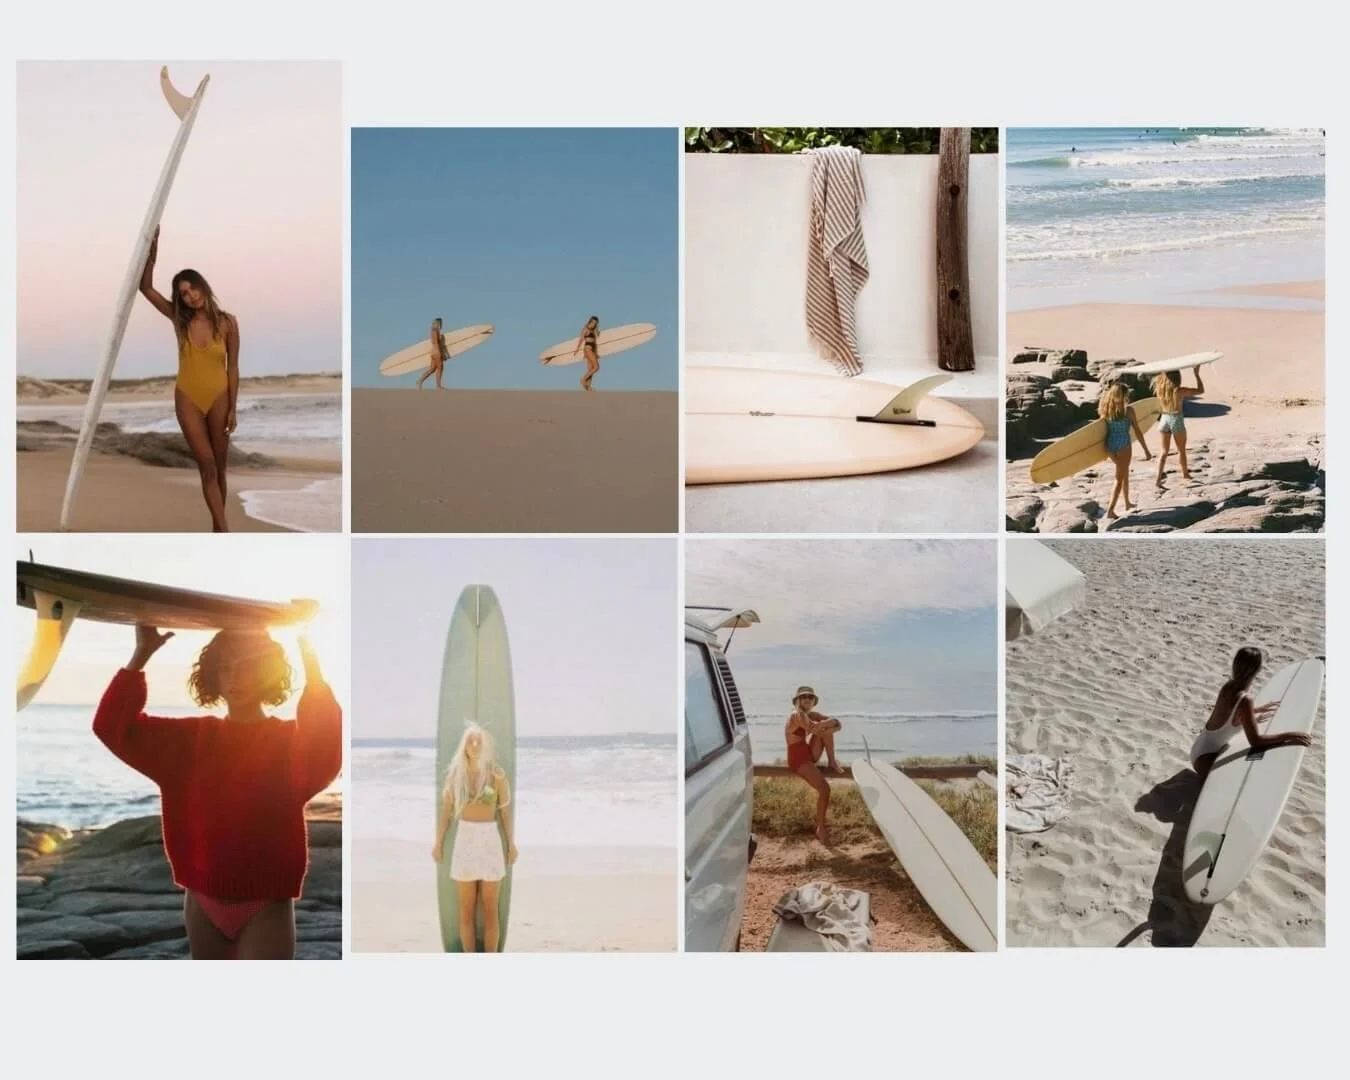
Step 5: Make it visual with example photos
A written list is fine, but a visual one is better. Pair it with a mood board or reference shots and suddenly everyone’s on the same page: clients, stylists, models, you. If you’re still building that step into your process, I’ve shared how I create mood boards for brand photography here.
For the Nostalgic Surf shoot, I created a a series of simple collages to follow on my phone, but when I work in a bigger team, I create a google slides doc that can be printed as a PDF, where every line item had an inspiration image (or a few) beside it. On the day, we can glance at it and instantly get what we were working toward.
Step 6: Stay flexible for creative purposes
Shot lists are guides, not rules. Some of my fave images have happened because I stepped off-list. A wave breaking just right, a laugh between models, sunlight hitting the model or product in a way I hadn’t planned.
The list keeps you grounded, but the magic happens in the in-between.
Step 7: Plot timings
In many cases, my shot list also gets developed into the run sheet!
Plotting in timing only comes once the shot list is together and we start to predict how long each shot will realistically take.
Your client will love you for this!
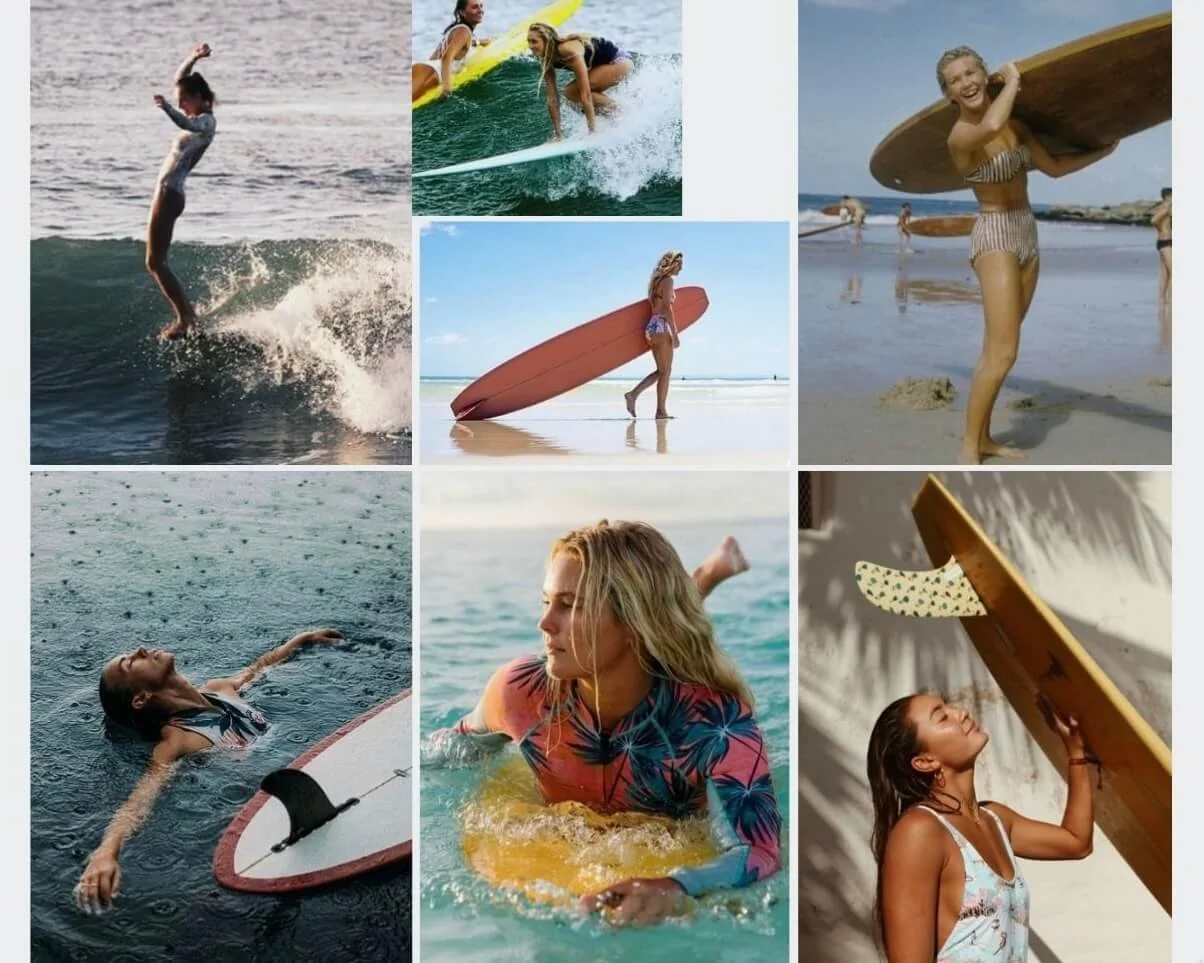
Example mini shot list
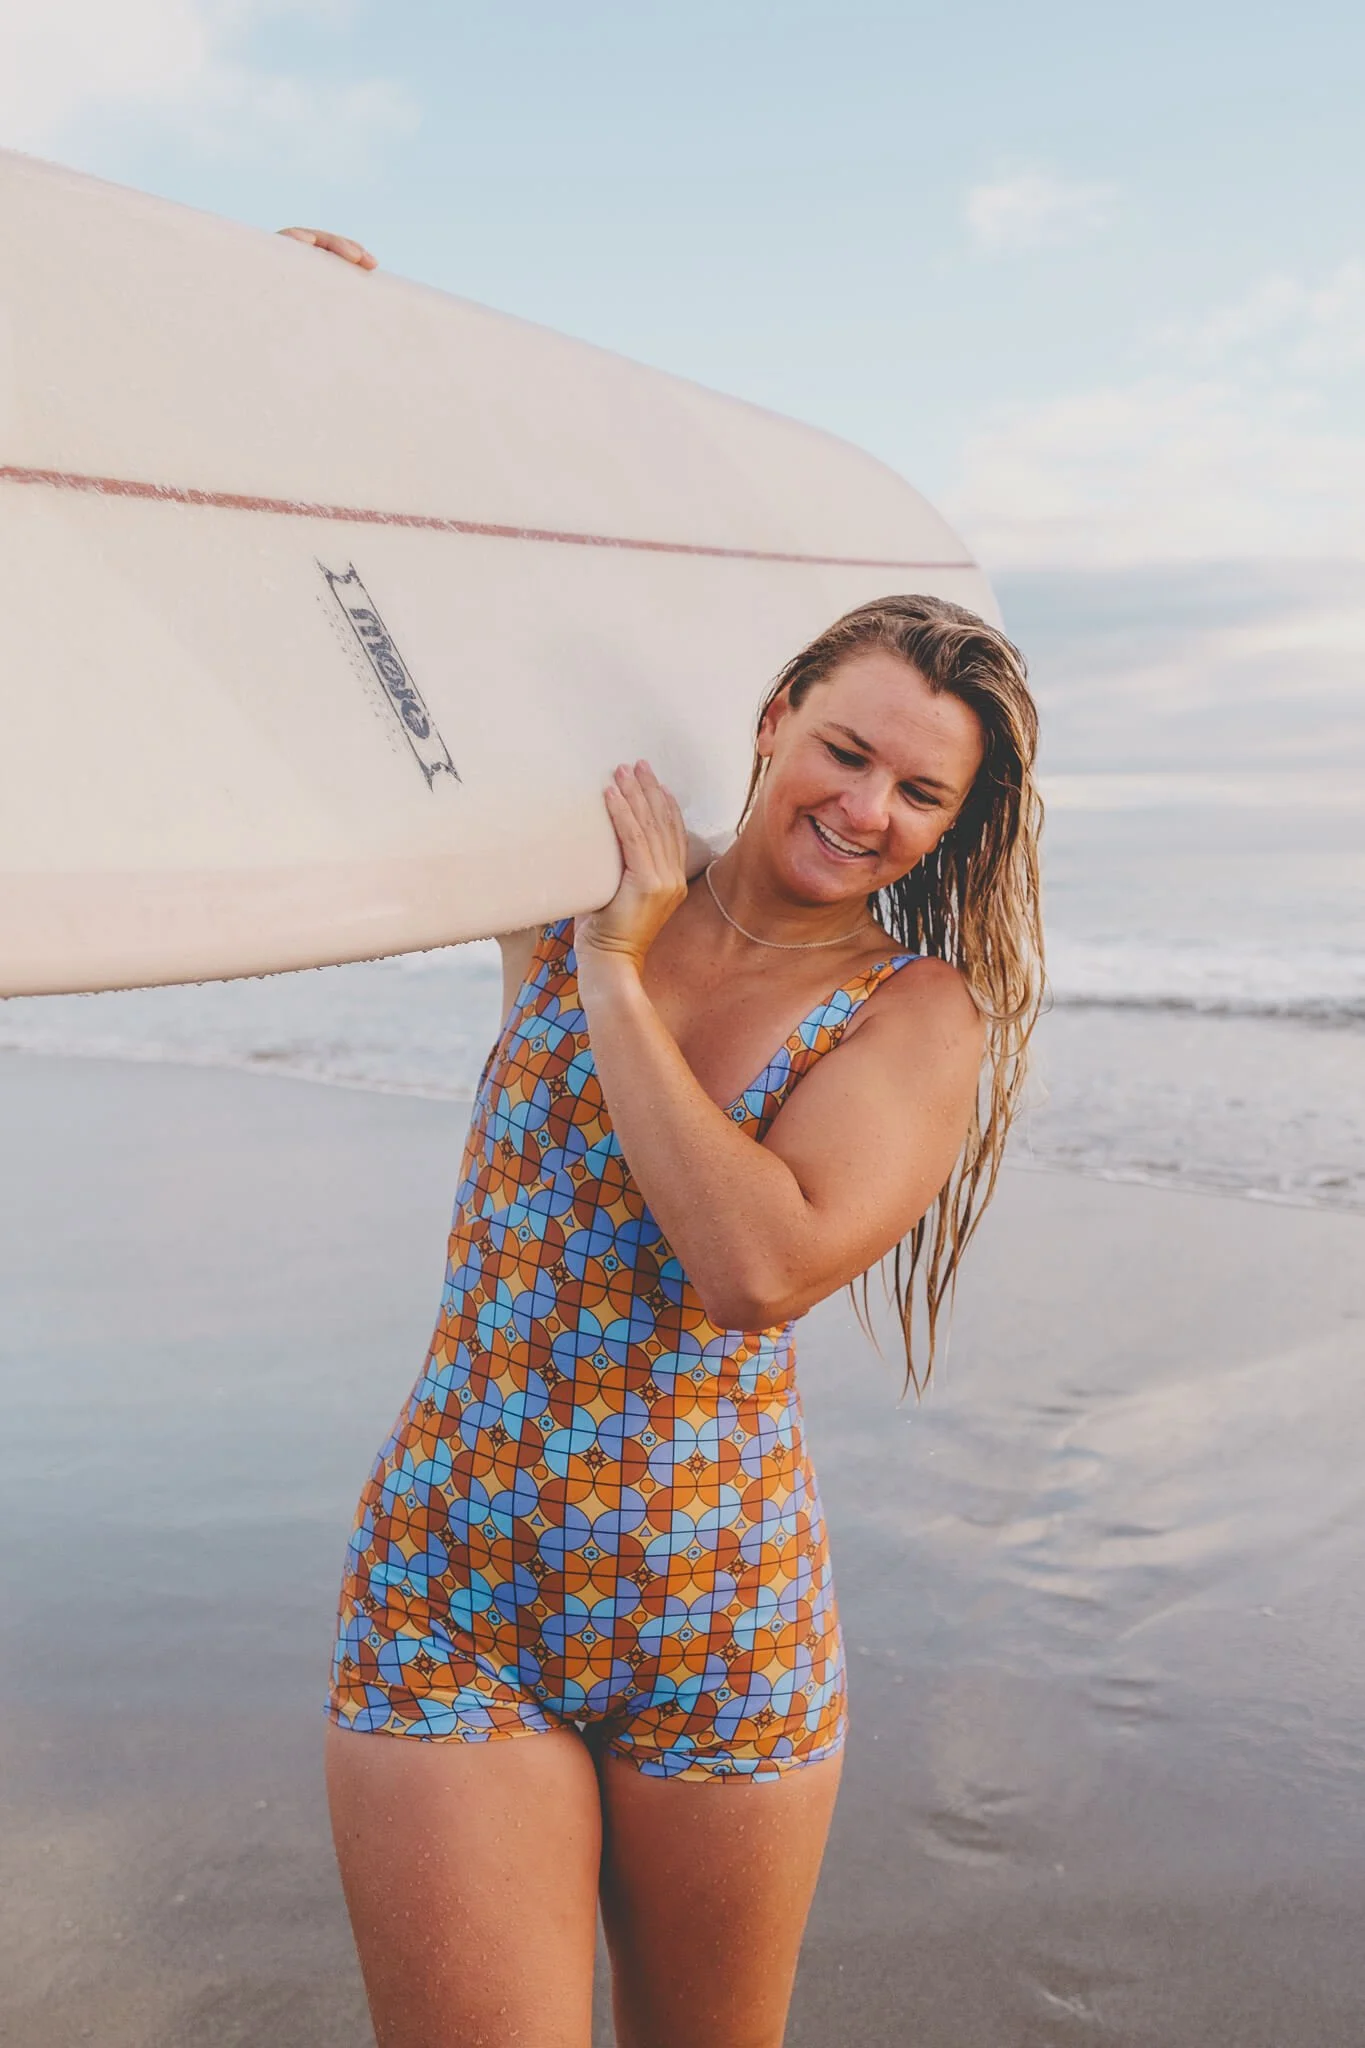
Here’s what a super simplified surfwear campaign shot list might look like to start with. I’ll usually start with a list like this in Notion and then build it out in Google Sheets (see what free photography workflow tools I use here). I’ve included photos below from the actual shoot so you can see how those turned out:
Wide: model walking across dunes with board
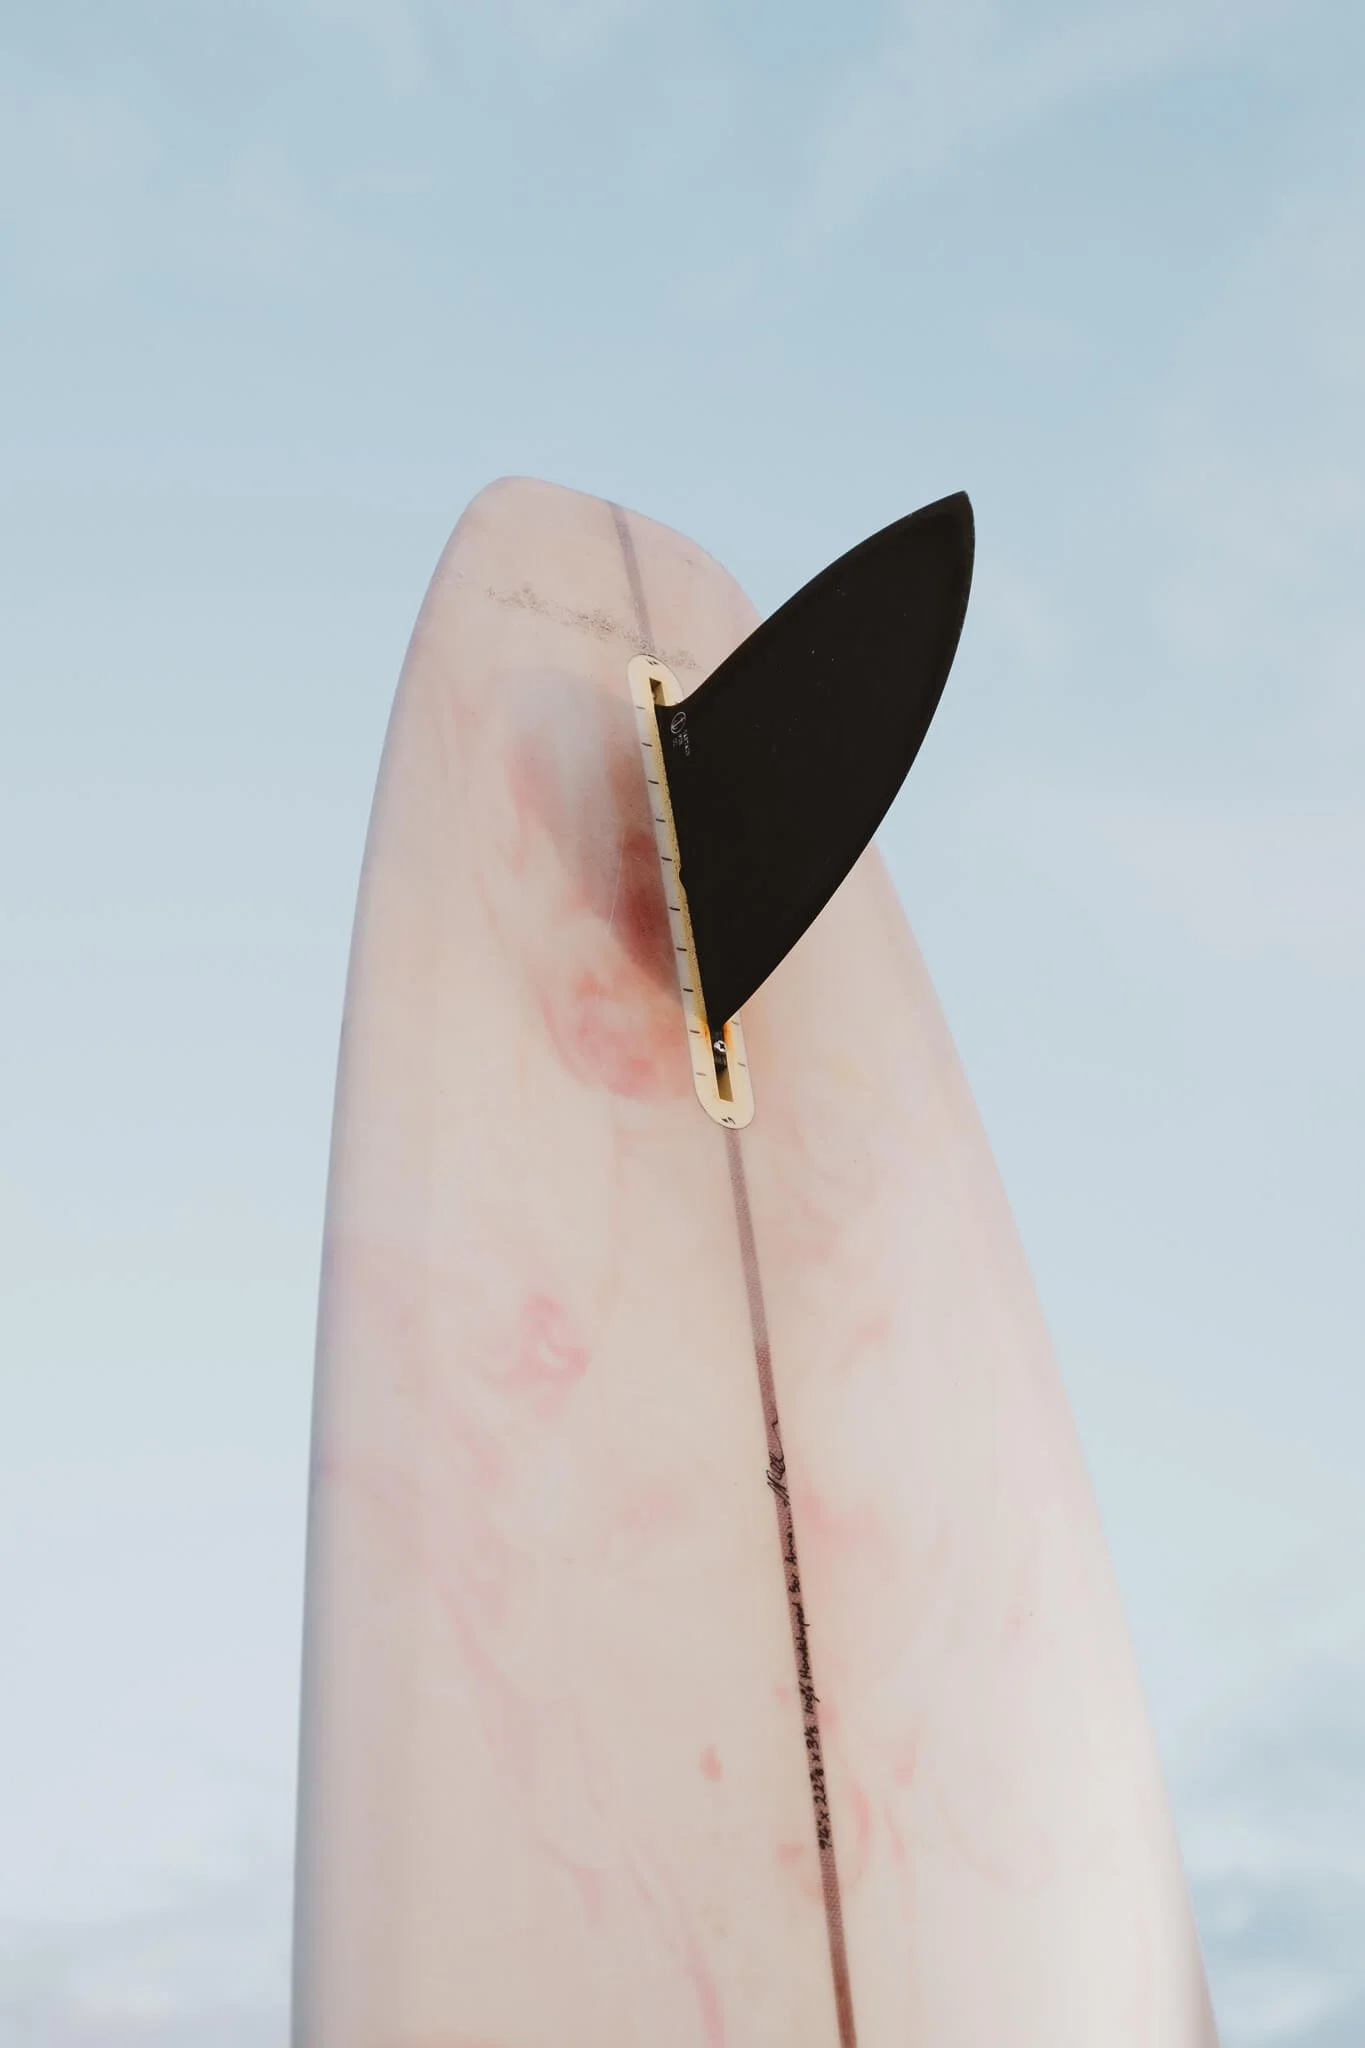
Detail: surfboard with sand and droplets
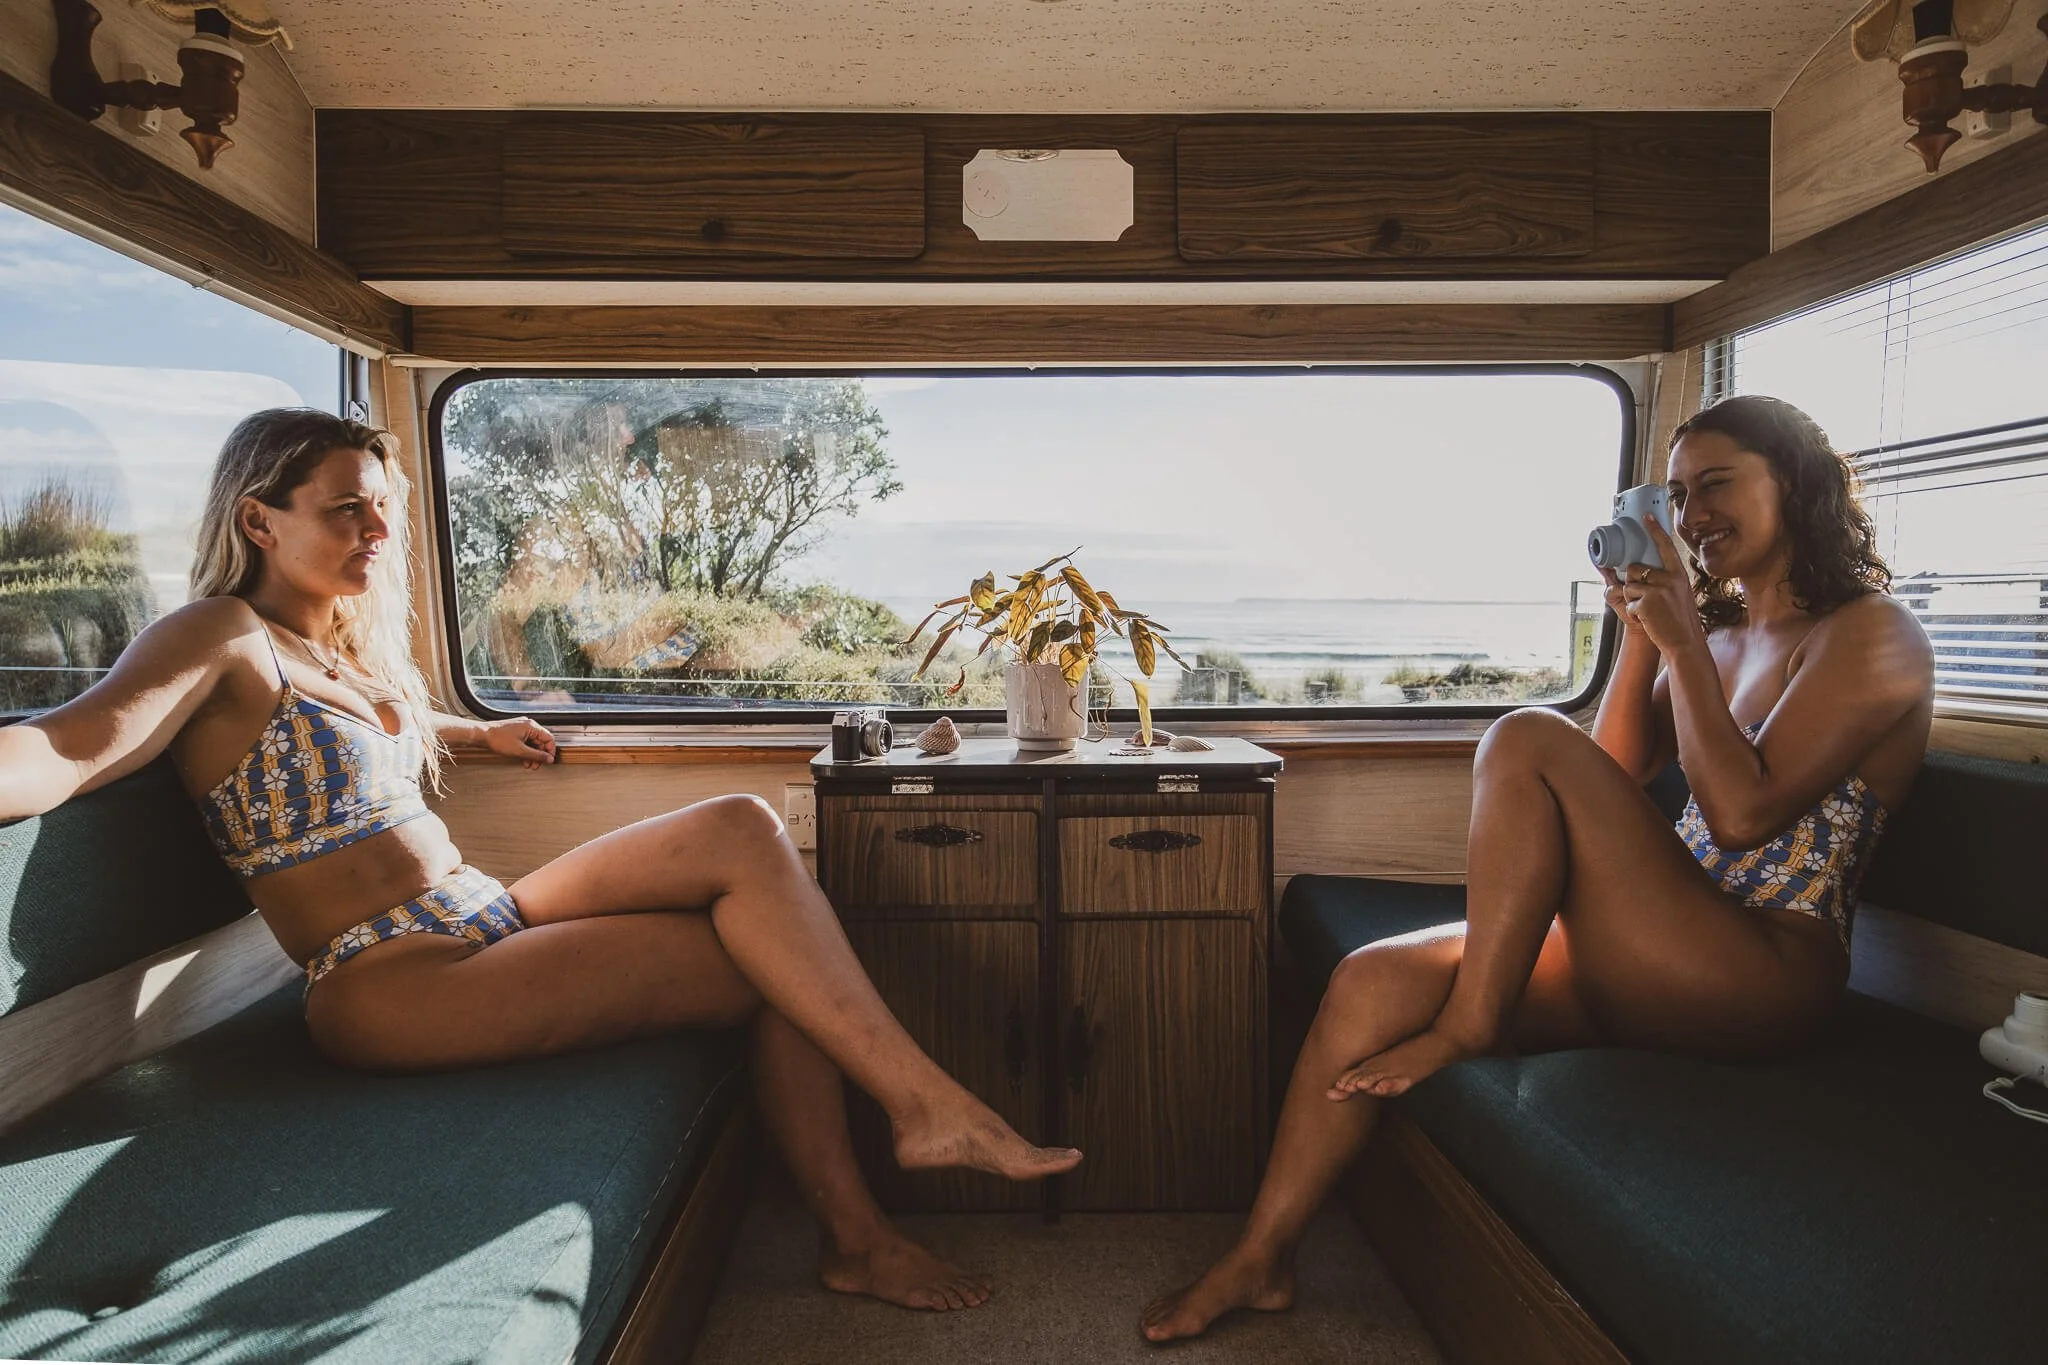
Lifestyle group: surfers sitting in caravan between surfs
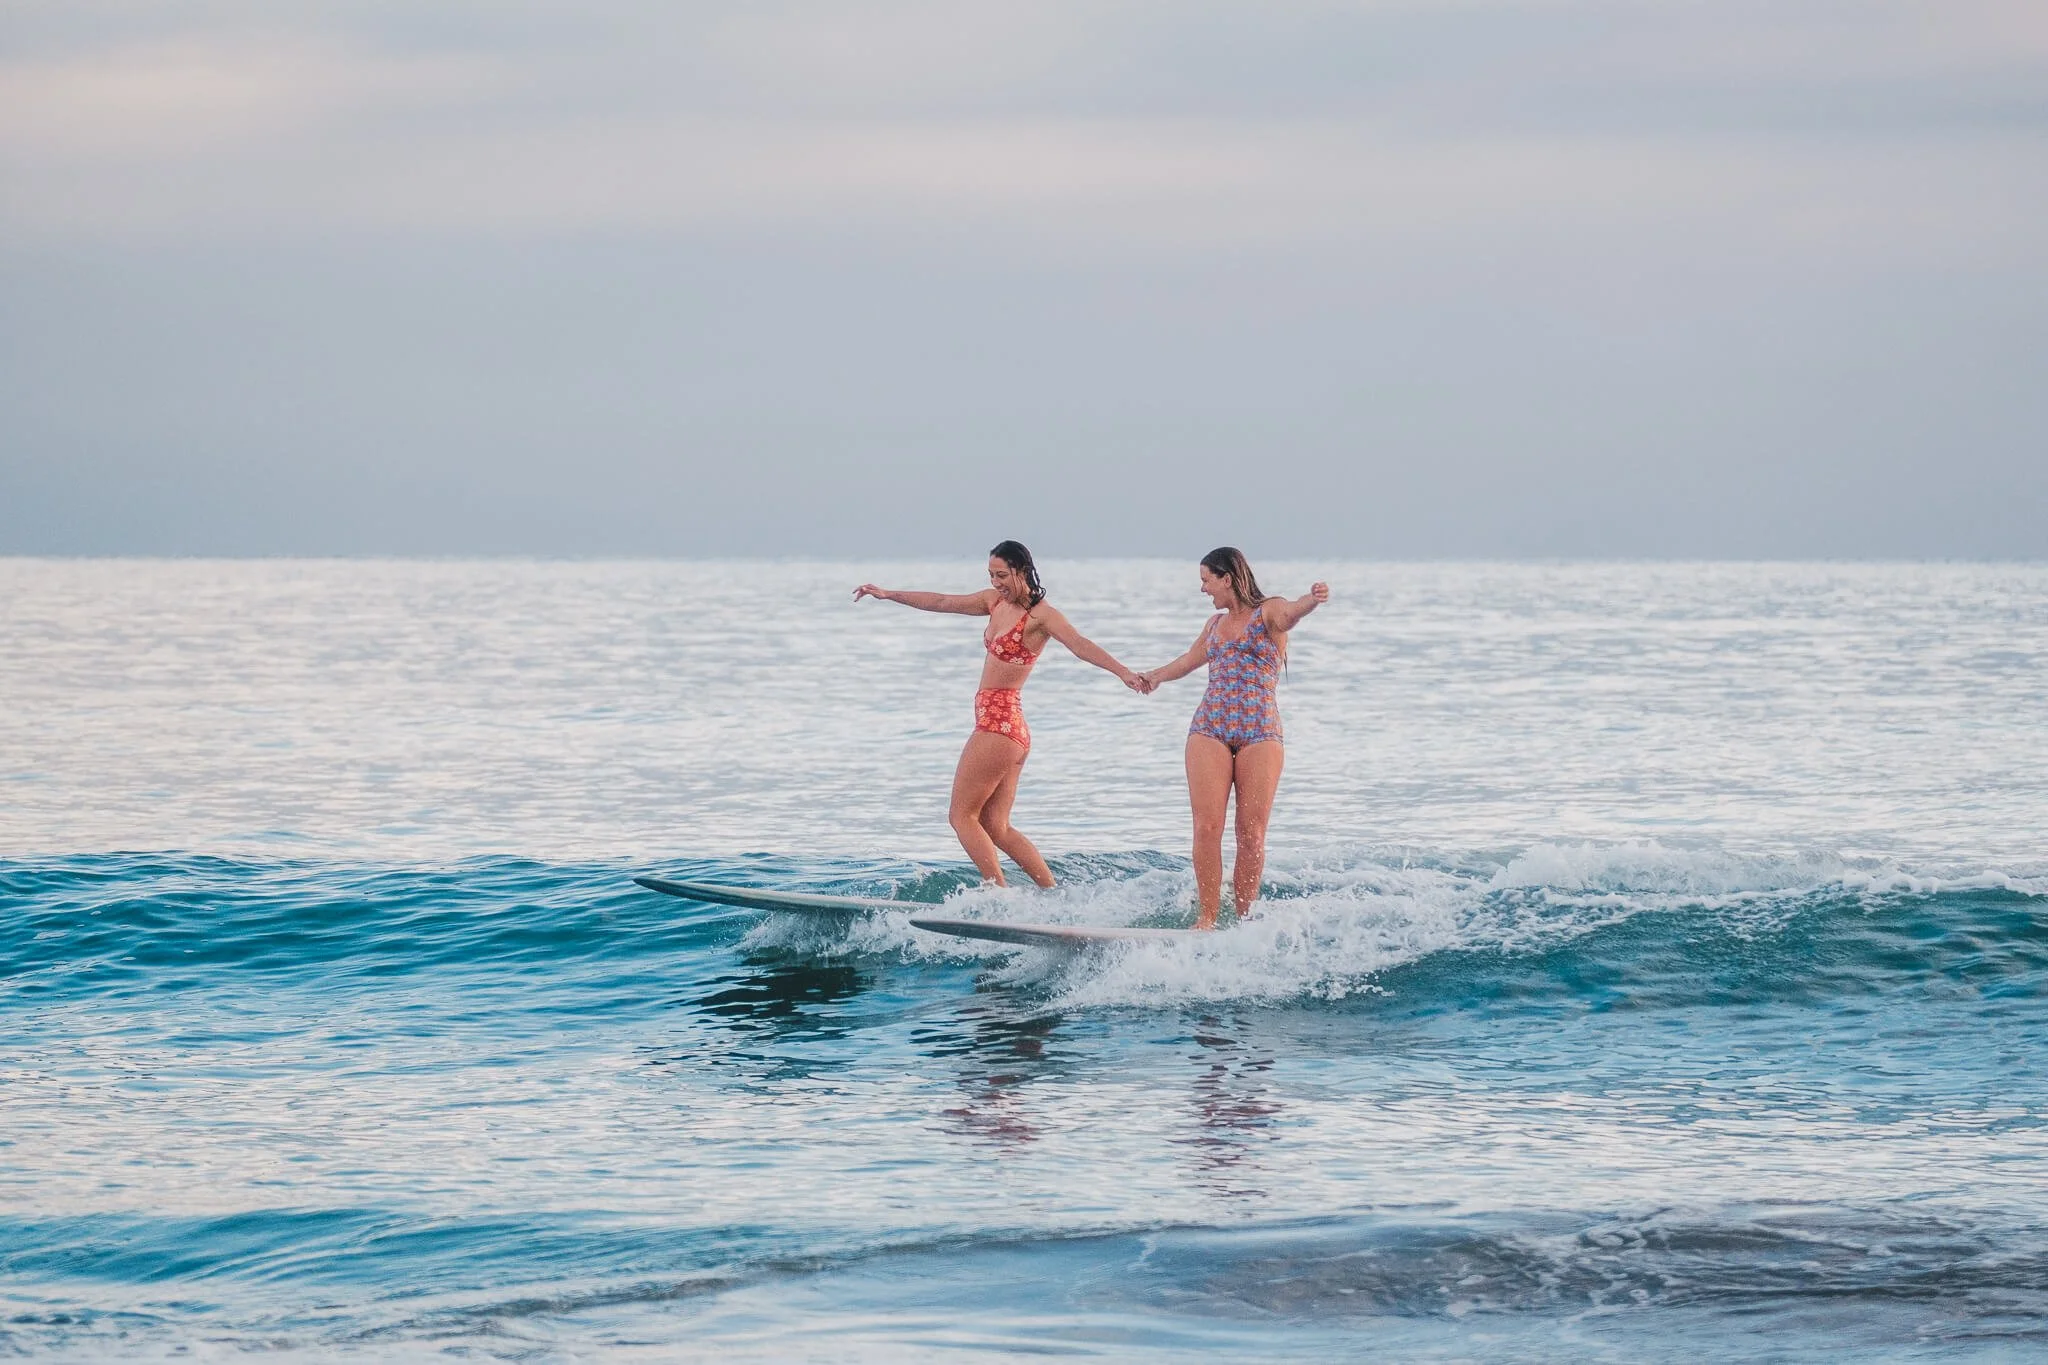
Action: surfers in the water
Candid: walking back with smiles after the surf

That’s a wrap
If you’re planning a brand shoot and want imagery that feels intentional, calm, and story-driven, this exact process is what I use with my brand photography clients.
A shot list doesn’t limit your creativity. It unlocks it. Once you know the essentials are covered, you’re free to experiment, to play, and to capture the unexpected!
Until next,
L ✌️
FAQs about brand photography shot lists
What should be included in a brand photography shot list?
A strong shot list includes lifestyle shots, product details, storytelling wides, and some candid moments. Breaking it into must-haves and nice-to-haves helps you stay focused.
How do photographers plan a shot list for clients?
Start with the client’s goals, figure out where the images will live, then break the list into categories. Adding mood boards or reference images makes it easier for everyone to stay aligned.
Do I really need a shot list for every shoot?
Yes. Even a loose list gives structure and makes sure you don’t miss important shots. It doesn’t have to be strict, just enough to keep you on track.
How flexible should I be with a shot list?
Very. The list is a guide, but some of the best photos happen when you step off-list and follow the moment.
Can I use the same shot list template for different clients?
For sure. A template saves time, but you’ll want to tweak it for each brand’s unique goals and style.